Tuesday, December 4, 2007

Enclosure Types


Enclosure Types


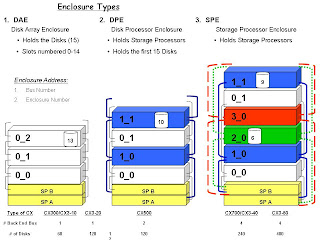
The above page diagrams the back-end structure of a Clariion. How the disks are laid out. Before we discuss the back-end bus structure, we should discuss the different types of enclosures that the Clariion contains.


1.DAE. The Disk Array Enclosure. Disk Array Enclosures exist in all Clariions. DAE’s are the enclosures that house the disks in the Clariion. Each DAE is holds fifteen (15) disks. The disks are in slots that are numbered 0 to 14.


2.DPE. The Disk Processor Enclosure. The Disk Processor Enclosure is in the Clariion Models CX300, CX400, CX500. The DPE is made up of two components. It contains the Storage Processors, and the first fifteen (15) disks of the Clariion.


3.SPE. The Storage Processor Enclosure. The Storage Processor Enclosure is in the Clariion Models CX700 and the CX-3 Series. The SPE is the enclosure that houses the Storage Processors.


The diagrams above lay out the DAE’s back-end bus structure. Data that leaves Cache and is written to disk, or data that is read from disk and placed into Cache travels along these back-end buses or loops. Some Clariions have one back-end bus/loop to get data from enclosure to enclosure. Others have two and four back-end buses/loops to push and pull data from the disks. The more buses/loops, the more expected throughput for data on the back-end of the Clariion.


The Clariion Model on the left is a diagram of a CX300/CX3-10 and CX3-20. These models have a single back-end bus/loop to connect all of the enclosures. The CX300 will have one back-end bus/loop running at a speed of 2 GB/sec, while the CX3-Series Clariions have the ability to run up to 4 GB/sec on the back-end.


The Clariion Model in the middle is a diagram of a CX500. The CX500 has two back-end buses/loops. This gives the CX500, twice the amount of potential throughput for I/Os than the CX300.


The Clariion Model on the right is a diagram of a CX700, CX3-40 and CX3-80. These Clariions contain four back-end buses/loops. The CX3-80 will contain the maximum back-end throughput with all four buses having the ability to run at a 4 GB/sec speed.


Each enclosure has a redundant connection for the bus that it is connected. This is in the event that the Clariion loses a Link Control Card (LCC) that allow the enclosures to move data, or the loss of a Storage Processor. You will see one bus cabled out of SP A and SP B, allowing both SP’s access to each enclosure.


Enclosure Addresses


To determine an address of an enclosure, we need to know two things, what bus it is on, and what number enclosure it is on that bus. On the Clariions in the left diagram, there is only one back-end bus/loop. Every enclosure on these Clariions will be on Bus 0. The enclosure numbers start at zero (0) for the first enclosure and work their way up. On these Clariions, the first enclosure of disks is labeled Bus 0_Enclosure 0 (0_0). The next enclosure of disks is going to be Bus 0_Enclosure 1 (0_1). The next enclosure of disks 0_2, and so on.


The CX500, with two back-end buses will alternate enclosures with the buses. The first enclosure of disks will be the same as the Clariions on the left of Bus 0_Enclosure 0 (0_0). The next enclosure of disks will utilize the other back-end bus/loop, Bus 1. This enclosure is Bus 1_Enclosure 0 (1_0). It is Enclosure 0, because it is the first enclosure of disks on Bus 1. The third enclosure of disks is going to be back on Bus 0, 0_1. The next one up is on Bus 1, 1_1. The enclosures will continue to alternate until the Clariion has all of the supported enclosures. You might ask why it is cabled this way, alternating buses. The reason being is that most companies don’t purchase Clariions fully populated. Most companies buy disks on an as needed basis. By alternating enclosures, you are using all of the back-end resources available for that Clariion.

The Clariions on the right show the four bus structure. The first enclosure of disks is going to be Bus 0_Enclosure 0 (0_0) as all other Clariions. The next enclosure of disks is Bus 1_Enclosure 0 (1_0). Again, using the next available back-end bus, and being the first enclosure of disks on that bus. The third DAE is going to be Bus 2_Enclosure 0 (2_0). The fourth DAE is on the fourth and last back-end bus. It is Bus 3_Enclosure 0 (3_0). From here, we are back to Bus 0 for the next enclosure of disks. Bus 0_Enclosure 1 (0_1). The next DAE is 1_1. The next would be 2_1 if we had one. 3_1, 0_2, and so on until the Clariions were fully populated.


Disk Address


The last topic for this page are the disks themselves. To find a specific disk’s address, we use the Enclosure Address and add the Slot number the disk is in. This gives us the address that is called the B_E_D. Bus_Enclosure_Disk. The Clariion on the left has a disk in slot number 13. The address of that disk would be 0_2_13. The Clariion in the middle has a disk in slot number 10 of Enclosure 1_1. This disk address would be 1_1_10. And the Clariion on the right has a disk in Bus 2_Enclosure 0. It’s address is 2_0_6. And the disk in Bus 1_Enclosure 1 is in slot 9. Address = 1_1_9.


Finally, each Clariion has a limit to the number of disks that it will support. The chart below the diagrams provides the number of how many disks each model can contain. The CX300 can have a maximum of 60 disks, whereas the CX3-80 can have up to 480 disks.


The importance of this page is to know where the disks live in the back of the Clariion in the event of disk failures, and more importantly how you are going to lay out the disks. Meaning, what applications on going to be on certain disks. In order to put that data onto disks, we have to create LUNs (will get to it), which are carved out of RAID Groups (again, getting there shortly). RAID Groups are a grouping of disks. To have a nice balance and to achieve as much performance and throughput on the Clariion, we have to know how the Clariion labels the disks and how the DAE’s are structured.
Cache WaterMarks


WaterMarks


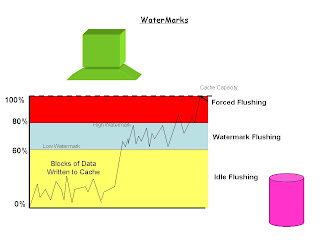
WaterMarks is what controls writing data out of Cache to disk. It is used to manage how long data stays in Write Cache before it is written to disk.


This diagram is used to describe the types of “Flushing” data to disk, or writing data out of Cache to disk.


The first type of Write Cache Flushing is Idle Flushing.


Idle Flushing is when the Clariion has the ability to take the ‘writes” into cache, send the acknowledgement back to the host that the data is on “disk.” While this is happening, the Clariion can also write data out to disk. The Clariion will try to write to disk in a 64 KB “Chunk.” The cache is absorbing the writes, grouping them together, and writing them to disk. This will come into play later when we discuss how the Clariion formats the disks. This is the perfect case scenario. The Cache takes in the writes, the Clariion has the resources to write the blocks to disk.


The second type of Flushing is WaterMark Flushing.


This is maintained by percentages that you can configure in Cache. The goal with WaterMark Flushing is to keep the Write Cache level between these two percentages. We are using the default Low WaterMark Setting of 60%, and High WaterMark Setting of 80%. These can be changed, and we will discuss that later. With WaterMark Flushing, Cache is going to do it’s best to keep Write Cache between these two levels. As Write Cache hits the High WaterMark, the Clariion tries to flush down to the Low WaterMark. If the amount of Write Cache is constantly between these two levels, the Clariion is doing its job.


The last type of flushing is the “Forced Flush.”


A Forced Flush of Cache results in the Write Cache reaching capacity. The Clariion will no longer accept data into write cache, as there is no more room.


When a Forced Flush occurs, the following take place:


1. The Clariion disables Write Cache.
2. The Clariion begins to destage/flush the write data in Cache out to disk.
3. Now comes the performance issue. With the Clariion disabling Write Cache, any new writes that come in from a host will bypass cache and be written directly to disk. The host/application is now waiting for the acknowledgement to return after the data was written to disk.
4. The Clariion will keep Write Cache disabled until it flushes to the Low WaterMark.
5. Once Write Cache is flushed to the Low WaterMark level, Write Caching is automatically re-enabled.

Wednesday, November 28, 2007

Cache Page Size


Cache Page Size

Here we are discussing the use of the Cache Page Size. We say that it is the same as saying Cache Block Size. Each “Page” or block in Cache is a fixed size. And, in the Clariion, the entire Cache is the same fixed size. Therefore, we feel that this is one of the areas in Cache where knowing your environment (applications, etc) can make a difference. In the diagram above, we are illustrating the use of Cache with three different applications, Oracle, SQL, and Exchange. Next to the applications is a Block Size. We are using these three applications in this diagram because these seem to be the most common applications people come to class with.


Next to the applications is a default Block Size. Again, we are only using these as examples. You want to verify the applications running on the Clariion and their Block Sizes.


There are four different Page Size Settings in Cache for the Clariion, 2 KB, 4 KB, 8 KB, and 16 KB. Let’s start with the default Clariion Page Size of 8 KB. Again, every “Page” in Cache will be 8 KB in size. If we have an application like Oracle running on this Clariion, and Oracle using a default Block Size of 16 KB, that would mean that every Oracle Block of data to the Clariion would be broken into two separate Pages in Cache. With SQL writing to this 8 KB Page Size, it is a one to one ratio, as it is with Exchange, however, with every Exchange Block of data, there is a 4 KB waste of space per block, which could be filling up Cache more rapidly with this “wasted space.”


The next Page Size down shows a 4 KB Page Size for Cache. The nice thing about this size in Cache is that there is no wasted space. Exchange is still in a 1:1 ratio of blocks. However, SQL now has to split into two separate Cache Pages, and Oracle splits into four separate Cache Pages. The good thing about this size is “No Wasted Space.” The down side to this is now we have to listen to the Oracle and SQL admins complain about performance.


So, we set the Page Size to 16 KB to appease the Oracle and SQL admins. Here comes the problem again of wasted space in cache, which, depending on your Clariion, you don’t have a lot of. With the 16 KB Page Size, all of the applications write to one Cache Page. The applications are happy because of this, but we are back to the wasted space. For every Exchange block written to the Clariion, there is a waste of 12 KB Cache space. For every SQL Block, there is a waste of 8 KB Cache Space.


If you are only using one of these applications on the Clariion, great, match the Cache Page Size to that application. If that is not the case, you as the Storage Administrator, will have to decide the Winners and Losers. Next to each of the different page sizes, we have listed the Winners, and the Losers.


In the 8 KB Page Size, SQL and Exchange are winners because from the application point of view, they are a 1:1 ratio. Oracle is a Loser because it is split across two separate blocks in Cache. Another loser in this setting is the Clariion Cache because of the wasted space.

In the 4 KB Page Size, Exchange and Cache are winners because Exchange is again a ratio of 1:1, and no wasted space in Cache. Oracle and SQL are losers because they are written to separate Pages in Cache.

With the 16 KB Page Size, the applications all win. Oracle, SQL and Exchange are all a 1:1 ratio. The big loser in this setting is Cache. Cache is a loser with all of the wasted space.
This, again is one of the places to look at for performance of Cache in a Clariion. Knowing your environment plays a big piece in how things are written to Cache.

Cache Allocation


Cache Allocation


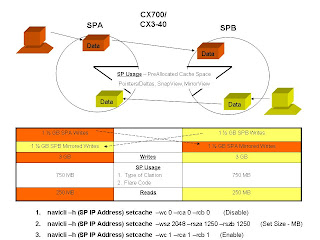
In the illustration above, we are seeing again that if data is written to one Storage Processor, it is MIRRORed to the other Storage Processor.


A host that writes data to SP A, will mirror to SP B, and vice versa. So, you will be losing some Cache space to this mirroring. In this example, we are setting SP A’s Write Cache to 1 ½ GB. Which means that over on SP B, 1 ½ GB of Cache space will be taken for the Mirroring of SP A’s Write Cache. The same scenario is set for SP B. The same values are transferred across SPs for Write Cache.


SP Usage


SP Usage is pre-allocated Cache Space that is used by the Clariion for things like pointers/deltas, SnapView, MirrorView. The amount of space that is lost per Storage Processor for SP Usage depends on a couple of things. First, is the type of Clariion you have. Second, what Flare Code you are running on the Clariion. We’ll talk later where to find the Flare Code your Clariion is running.


In this example, we are using 750 MB per Storage Processor as the vaule for SP Usage. To give you some real numbers:


Type of Clariion Flare Code SP Usage:
CX3-80 26 1464 MB
CX3-80 24 1464 MB
CX700 26 884 MB
CX700 24 832 MB


After Write Cache is allocated and SP Usage is taken into account, this leaves us with 250 MB of Cache for Reads.


The nice thing about the Clariion though is that it allows you to change those cache values. Let’s say for instance, that this initial setup above works for you in the mornings when people are writing to a database, but later in the day, the database has more reads. You can take from Write Cache and give the rest to Read Cache. The other nice thing about it is that it can be scripted from the Command Line Interface. Below the chart are the three commands that you can use to change cache.


Command One


Before we can change the values of Cache, we must first disable Cache. This command is the command to disable Write Cache, Read Cache of SP A and SP B. Not only does this disable Cache, it also forces a Flush of Cache to disk. This means that the command prompt will not return immediately. There will be a delay in the command prompt returning until Cache is flushed. As I always say, I cannot give you an amount of time that this will take (two weeks). The answer is going to be….”it depends, you’ll have to test it.”


Command Two


This is the actual setting of Cache command. By default, the setting of Cache is allocated in MegaBytes. By setting Write Cache to 2048 MB (2 GB), we are telling the Clariion to take that number, and divide half of it for SP A Write Cache, and half for SP B Write Cache. We don’t calculate into this the Mirroring of Write Cache, just the actual usable space. Next, we specify the amount for the Read Cache Size of SP A of 1250 MB (1.25 GB) and the Read Cache Size of SP B of 1250 MB (1.25 GB). Read Caching is not Mirrored, so we must specify both SPs Read Cache. Notice how by simply taking ½ GB away from SP A and SP B Write Cache, we can allocate 1 GB more of Cache space to the SPs for Reads.


Command Three


Finally, we have to re-enable Cache. The ones (1) next to –wc, -rca, and –rcb stand for Enabling.


Changing the values of Cache could be done at any time, all day long if you want to, though I wouldn’t recommend it. But, it could prove to be extremely beneficial to performance of the Clariion. Acknowledgements from Writes, and Reading from Cache is going to happen in Nanoseconds as opposed to milliseconds coming from disk.


Another example of why to change Cache could be when Backups are going to occur. Since you will be reading data from Clariion Luns, you could allocate as much Cache to Reads as possible so that the Backup Host could be retrieving data from Cache rather than disk. When the Backups are complete, you could script that the Cache values go back to Production Levels.


Tuesday, November 13, 2007

Caching


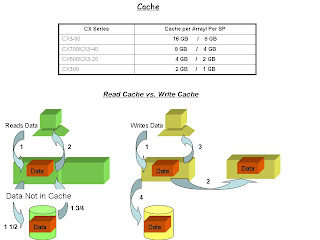
From the chart above, the amount of Cache that a Clariion contains is based on the model.

Read Caching
First, we will describe the process of when a host issues a request for data from the Clariion.

1.The host issues the request for data to the Storage Processor that owns the LUN. If that data is sitting in Cache on the Storage Processor,
2.The SP sends the data back to the host.

If however, the data is not in Cache, the Storage Processor must go to disk now to retrieve the data. (Step 1 ½ ). It reads the data from the LUN into Read Cache of the owning Storage Processor. (Step 1 ¾ ) before it sends the data to the host.

Write Caching

1.The host writes a block of data to the LUN’s owning Storage Processor.
2.The Storage Processor MIRRORs that data to the other Storage Processor.
3.The owning Storage Processor then sends the Acknowledgement back to the host, that the data is “on disk.”
4.At a later time, the data will be “flushed” from Cache on the SP out to the LUN.

Why does Write Cache MIRROR the data to the other Storage Processor before it sends the acknowledgement back to the host?

This is done to ensure that both Storage Processors have the data in Cache in the event of an SP failure. Let’s say that the owning Storage Processor crashed (again, never happens). If that data was not written to the other Storage Processor’s Cache, that data would be lost. But, because it was written to the other SP Cache, that Storage Processor can now write that data out to the LUN.

This MIRRORing of Write Cache is done through the CMI (Clariion Messaging Interface) Channel which lives on the Clariion.

Zoning


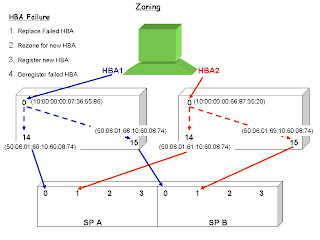
On this page, we are going to discuss how a Host might be zoned through switches to a Clariion. This host has two(2) Host Bus Adapters. From the previous page, we know that the host must have at least one connection to SP A and one connection to SP B. What we are illustrating here is from the “Host to Clariion Configuration” page, Configuration Three. We are also going to look at what is meant by “Single Inititiator Zoning”. Single Initiator Zoning means that you create a zone with one HBA entry. We don’t want to have a zone that would contain an HBAs from two(2) Hosts.


HBA1 is connected to Port 0 on the switch. SP A port 0 is connected to the same switch at Port 14. Based on the World Wide Names of HBA1 and SP A port 0, we can now create a zone through the switch software. The zone could look as follows:


Zone HBA1 to SP A port 0
10:00:00:00:07:36:55:86
50:06:01:60:10:60:08:74


We also want to connect HBA1 to SP B. We connect SP B port 0 to Port 15 on the same switch. That zone could look as follows:


Zone HBA1 to SP B port 0
10:00:00:00:07:36:55:86
50:06:01:68:10:60:08:74


HBA1 is now zoned and connected to both Storage Processors on the Clariion.
We would repeat the same steps for HBA2 and the switch that it is connected to. HBA2 is connected to Port 0 on the switch. SP A port 1 is connected to the same switch at Port 14. Based on the World Wide Names of HBA1 and SP A port 1, we can now create a zone through the switch software. The zone could look as follows:


Zone HBA2 to SP A port 1
10:00:00:00:66:87:35:20
50:06:01:61:10:60:08:74


We also want to connect HBA2 to SP B. We connect SP B port 1 to Port 15 on the same switch. That zone could look as follows:


Zone HBA2 to SP B port 1
10:00:00:00:66:87:35:20
50:06:01:69:10:60:08:74


Another way in which the zoning could have been done is:


Zone HBA1 to SP A port 0 and SP B port 0
10:00:00:00:07:36:55:86
50:06:01:60:10:60:08:74
50:06:01:68:10:60:08:74


Again, there is only one HBA in that zone. The preferred method is simply up to you and how you want to manage the switches. The advantage of doing it this way is that it cuts the number of zones on the switch in half, but could be a little confusing (which could be nice for job security).
Now, what do we do if there is an HBA failure? First of all, that never happens. (Kidding) This is where we go to the four(4) steps listed under HBA Failure. The three R’s and a D. Let’s say that HBA1 were do fail. The first thing we would do is to replace that failed HBA. Next, because we did our zoning on the switch based on the World Wide Names of the HBAs, we would have to rezone the switch for the new HBA because it would have a new World Wide Name. The third step is to go to Navisphere, and using Connectivity Status, Register the new HBA with the Clariion. And finally, the Clariion does not automatically clean itself up. You would have to again, in Connectivity Status, Deregister the failed HBA.

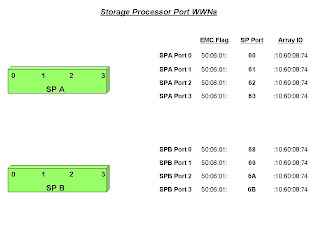
Storage Processor Ports WWNs


Each Storage Processor Port will have a unique World Wide Name associated with it. What we are doing on this page is to “break down” what makes up the SP Port WWN. What I am showing here are the three(3) pieces that make up the WWN. The three(3) pieces are what I am calling the ‘EMC Flag’, the SP Port Identifier, and the Array ID. All SP Port WWNs on Clariions start with the same ‘EMC Flag’ of 50:06:01. When you are looking at the Switch Software that shows the ports on the switch and what is plugged into those ports, anytime you see a World Wide Name that starts with the 50:06:01, you will know that a Clariion SP Port is connected there.


The next “piece” to the World Wide Name, is the SP Port Identifier. On all Clariions, these numbers are the same as well. For instance, if you have 3 Clariions in your environment, every one of those Clariion’s SPA Port 0 World Wide Name would start off 50:06:01:60. And every Clariion’s SP B Port 1 would start off 50:06:01:69. These SP Port Identifiers will not change from Clariion to Clariion.


The last “piece” to the puzzle is the Array ID. This is related to the Unique ID of the Clariion itself. Every Clariion has a unique World Wide Name associated with it. But, that Array ID belongs to every port on that Clariion as it shows above. Now, if you have two(2) Clariions in your environment, you will see two(2) sets of Array IDs. Let’s say you have a Production Clariion and a Development Clariion (I know, no one has that), the Production Clariion could have an Array ID of 10:60:08:74, and the Development Clariion could have an Array ID of 10:60:06:23. So, the Production Clariion’s SP A Port 0 would be 50:06:01:60:10:60:08:74, and the Development Clariion’s SP A Port 0 would be 50:06:01:60:10:60:06:23.

Wednesday, November 7, 2007

Host Connectivity Limitations


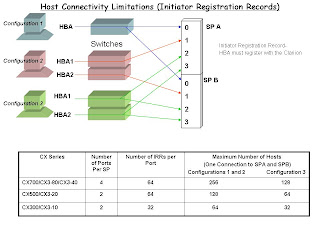
This page is going to discuss how many hosts can connect to a Clariion. The deciding factor in this is going to be the number of times you connect your host(s) to the Clariion. We are going to use the three configurations that were discussed in the prevoius blog. The chart above lists the number of ports each Storage Processor contains based on the model, as well as the number of Initiator Registration Records each port supports. An Initiator Registration Record (IRR) is used everytime a host, via an HBA, is connected and "Registered" with the Clariion. The Clariion now recognizes that this HBA belongs to a specific host attached to the Clariion, and will now allow the host to "talk" with the Clariion. The more times you connect and register a host, the more IRRs it uses, thus taking away potential connections for other or more hosts.

With Configuration One, even though it only has one HBA, that HBA must be connected at least once to SP A and once to SP B. Again, this goes back to the previous blog about access to the Clariion if a LUN were to trespass. Therefore, this host is using two IRRs.

With Configuration Two, this host has one connection from each HBA to one SP Port on each Storage Processor. Even though this host has two HBAs, it is still only using two IRRs. One connection to SPA, one connection to SP B.

With Configuration Three, this host has two connections to the Clariion from each HBA. HBA1 is connected once to SPA and once to SP B. HBA2 is connected once to SP A and once to SP B. This host is using four IRRs because it is connected four times to the Clariion.

In the chart, we are trying to illustrate the maximum number of hosts that can connect to a Clariion based on the host configurations. Again, the more times you connect a host, the more IRRs you use, the less the number of hosts that can be attached to a Clariion. If you are using a CX700, CX3-40 or CX3-80, you have the possibility of hooking up 256 hosts based on each host only having one connection to SP A and one connection to SP B. However, if every host were connected four(4) times, as in Configuration three, that number is cut in half to 128 hosts. If every host were connected to the Clariion eight(8) times, the number is cut again to 64 hosts.

Host to Clariion Configurations


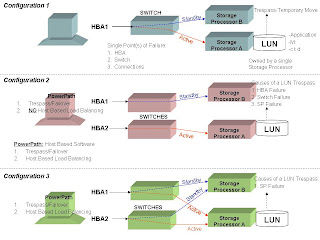
Here we are looking at only three possible ways in which a host can be attached to a Clariion. From talking with customers in class, these seem to be the three most common ways in which the hosts are attached.


The key points to the slide are:
1. The LUN, the disk space that is created on the Clariion, that will eventually be assigned to the host, is owned by one of the Storage Processors, not both.
2. The host needs to be physically connected via fibre, either directly attached, or through a switch.


CONFIGURATION ONE


In Configuration One, we see a host that has a single Host Bus Adapter (HBA), attached to a single switch. From the Switch, the cables run once to SP A, and once to SP B. The reason this host is zoned and cabled to both SPs is in the event of a LUN trespass. In Configuration One, if SP A would go down, reboot, etc...the LUN would trespass to SP B. Because the host is cabled and zoned to SP B, the host would still have access to the LUN via SP B. The problem with this configuration is the list of Single Point(s) of Failure. In the event that you would lose the HBA, the Switch, or a connection between the HBA and the Switch (the fibre, GBIC on the switch, etc...), you lose access to the Clariion, thereby losing access to your LUNs.


CONFIGURATION TWO


In Configuration Two, we have a host with two Host Bus Adapters. HBA1 is attached to a switch, and from there, the host is zoned and cabled to SP B. HBA2 is attached to a separate switch, and from there , the host is zoned and cabled to SP A. The path from HBA2 to SP A, is shown as the "Active Path" because that is the path data will leave the host from to get to the LUN, as it is owned by SP A. The path from HBA1 to SP B, is shown as the "Standby Path" because the LUN doesn't belong to SP B. The only time that the host would use the "Standby Path" is in the event of a LUN Trespass. The advantage of using Configuration Two over Configuration One, is that there is no single point of failure.


Now, let's say we install PowerPath on the host. With PowerPath, the host has the potential to do two things. First, it allows the host to initiate the Trespass of the LUN. With PowerPath on the host, if there is a path failure (HBA gone bad, switch down, etc...), the host will issue the trespass command to the SPs, and the SPs will move the LUN, temporarily, from SP A to SP B. The second advantage of PowerPath on a host, is that it allows the host to 'Load Balance' data from the host. Again, this has nothing to do with load balancing the Clariion SPs. We will get there later. However, in Configuration Two, we only have one connection from the host to SP A. This is the only path the host has and will use to move data for this LUN.


CONFIGURATION THREE


In Configuration Three, hardware wise, we have the same as Configuration Two. However, notice that we have a few more cables running from the switches to the Storage Processors. HBA1 is into the switch and zoned and cabled to SP A and SP B. HBA2 is into the switch and zoned and cabled to SP A and SP B. What this does now is to give HBA1 and HBA2 an 'Active Path' to SP A, and HBA1 and HBA2, 'Standby Paths' to SP B. Because of this, the Host now can route data down each active path to the Clariion, allowing the host "Load Balancing" capabilities. Also, the only time a LUN should trespass from one SP to another is if there is a Storage Processor failure. If the host were to lose HBA1, it still has HBA2 with an active path to the Clariion. The same goes for a switch failure and connection failure.

Monday, October 29, 2007

It's About Time


Having been teaching the Clariions for the past 7 years, I think it is time to have a place where knowledge, concepts, thoughts, advice, etc. are easily shared. I am going to be posting issues that have come up over the past days, weeks, months, years for all to view. It will be like you are back in the classroom listening to my dumb jokes all over again.

As you leave class, take this address with you to share with co-workers, as a place to ask and answer questions, to get the latest updates in the simplest forms, all of the good stuff.

Feel free to email me: data.storage.blogger@gmail.com


****Any use of the material for publication contained in the blog without written permission or consent is prohibited****